In this article, I’m going to show you how to presell yoga classes using WP Amelia and WooCommerce.
I am really busy working on my new cybersecurity startup, and it’s been some time since I’ve posted here. However, I thought I could share this project I worked on recently.
I developed a WooCommerce checkout improvement to help a Yoga Studio owner who needed to pre-sell tickets for his classes while providing a high-end user experience. Something smooth and non-technical that works automagically.
Given the success of my previous articles on WooCommerce improvements, I thought I’d take the time to share my work here, as it might help a few of you provide a better experience to your users.
Let’s get started, shall we?
Jump to
- The plan: to presell yoga classes using WooCommerce and WP Amelia
- Plugin requirements
- How to pre-sell classes in bulk using coupons
- Custom code to improve the plugins features
- Shavasana (conclusion)
The plan: to presell yoga classes using WooCommerce and WP Amelia

Ok, so what are we trying to achieve here?
The goal is to provide the best user experience possible to people looking to buy 5, 10 or 20 tickets for yoga classes. Discounts apply depending on the volume and I also needed it to be compatible with a specific payment gateway only compatible with WooCommerce.
Now, I didn’t have a blank slate to work with. The website was already online and used by yogis. The booking experience was already handled – quite beautifully — by WP Amelia.
So I did have a few constraints to work around, which gave a direction to the rest of the project.
There is a similar process presented by WooCommerce, however the user experience isn’t quite as good as we’ve built here — * showing off shamelessly *.
</a
Plugin requirements
Ok, before we get started, there are a few plugin requirements for this to work.
Here are the plugins we will use:
- WP Amelia is the best booking plugin I’ve had the chance to test. It’s complete, provides a great user experience, Stripe integration, staff portal. 80% of the yoga business can be run through it. I highly recommend you check out all the features. Oh, and it’s compatible with WooCommerce.
- WooCommerce is our e-commerce backbone here. We will use its API and plugins to create the desired user experience.
- WooCommerce Smart Coupons isn’t as smart as I’d like for this but still provides a great basis to pre-sell tickets. We use their API to improve the checkout flow. Also, kudos for their support, while working on this setup, I have exchanged with them and they actually improved a few features then followed up with me — although I was already a paying customer. Great job guys.
- Direct checkout for WooCommerce is optional as I like to build my own redirects but it really helps with the user experience and bypassing a few pages like the cart and shop pages that won’t really serve our purpose here
Once you have all of this paid and installed, we can dive into the configuration part.
How to pre-sell classes in bulk using coupons
There are two big parts here.
The first is to enable user to purchase packages of 5, 10 or 20 tickets for yoga classes. When they select a package, they purchase those places at a discount. These places are credited to their account.
The second part is to enable our user to use those places to book the yoga classes they like through Amelia.
Installing and configuring the plugins
I’ll let you dive into the Amelia documentation to learn to use and configure events, but make sure you configure correctly:
- the events you want your users to book
- the WooCommerce payment method: this will create an Amelia product to handle the bookings through WooCommerce
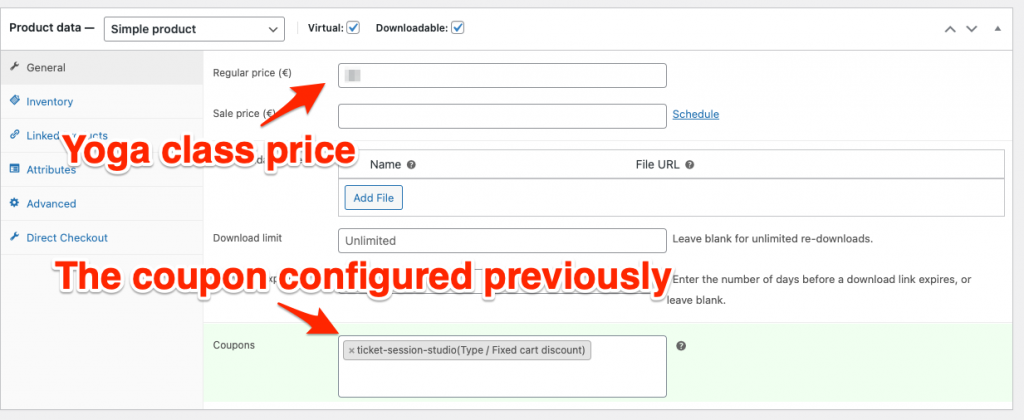
Now, for Smart Coupons, we need to create a “cart discount coupon” with the value of the yoga class price. Basically, each coupon is worth a yoga class. Using those, the user can access a class “for free”.
So here are the parameters you need for Smart Coupons in the General tab:
- Type: cart discount
- Amount: the price of one yoga session
- Autogenerate coupons with each time: checked
In the Usage Restriction and Usage limits tab:
- Products: assign the WooCommerce/Amelia booking product
- Usage limit per coupon: 1
- User limit per user: 1
Basically, this coupon will be duplicated each time a yoga ticket is bought and will allow to book a spot in Amelia for free. This is why each coupon should be used only once.
I suggest you leave the Direct Checkout plugin disabled for now as the Cart page is really useful to debug your work.
Finally, let’s configure the products.
Configuring the products
We need two products:
- the product that gives access to an Amelia reservation — this is included in the WooCommerce integration doc. Basically, when a user buys this product, he purchases access to an Amelia event
- the product that gives tickets (coupons, really) to purchase an Amelia reservation “for free” — because they already paid for the coupons
The first product should have been taken care of during the configuration of the WooCommerce payment through Amelia.
The second product should be a Smart Coupon product like so:
Ok, now that everything is configured, let’s talk about code improvements and feature development.
Custom code to improve the plugins features
So, now we have a good basis:
- we have a full-fledge booking system for our yoga classes thanks to WP Amelia
- we have a WooCommerce product to book those yoga classes
- we have a WooCommerce product to buy tickets to those you classes.
We still need to:
- set up discount system to incentivize the purchase of multiple tickets at once
- set up a counter system to show the user how many places he has
- improving the auto-apply feature from Smart Coupons to automatically use the coupons when a users books a session
- improve the user experience by bypassing the WooCommerce checkout page when the cost is 0
Phew.
…
Setting up custom discounts based on product quantity
As I said earlier, we want to incentivize our yogis to buy more yoga sessions. It’s better for them. The more they buy, the cheaper the unit price should be.
I’m sure WooCommerce as a plugin in store — see what I did? — for that but really, just a few line of PHP do the trick here.
// Get the cart content
$tickets_qty = $cart_qty[PLACE_PRODUCT_ID];
  $place_product = wc_get_product(PLACE_PRODUCT_ID);
  $place_price = $place_product->get_price();
  switch ($tickets_qty) {
    case 5:
      $discounted_price = DISCOUNT1;
      break;
    case 10:
      $discounted_price = DISCOUNT2;
      break;
    case 20:
      $discounted_price = DISCOUNT3;
      break;
    default:
      $discounted_price = DEFAULT_PRICE;
      break;
  }
// Update the item price
$item['data']->set_price( $discounted_price );
Good, now that we’re warmed up, let’s get into the real work.
Setting up a coupon counter system for the user and improving the auto-apply feature
The auto-apply feature is very interesting in our case : it allows people who have it to automatically benefit from the discount they provide, without having to enter it manually.
This is a tremendous boost in user experience.
However this isn’t compatible with having them automatically generated and assigned to a specific user — because we still want those precious restrictions, making sure only the user who paid for the places can use them.
So here’s the algorithm:
- Each time a new coupon is generated, check if it’s a discount coupon for yoga places
- If so, add it in an array to a user metadata
- At checkout, check this array
- If it’s not empty, check the coupon validity (product, user, expiration, …)
- If it’s valid, apply it and recalculate the cart total
- Delete the coupon from the array
This part takes care of bringing the total of the user’s cart to zero when they have places left. The coupons will be used first before asking them to pay for the reservation.
The additional benefit is that we just have to count how many coupons there are in the array to give the user a precise count of how many places he has left before having to purchase it again.
Improving the WooCommerce checkout process
This is the part I’m less proud of — like I’m proud of this all thing… — but really, it’s the cleanest way I found to keep using all the WooCommerce features while bypassing the checkout when the price is free.
As we’ve implemented the previous tweaks, our users will often have a checkout equal to 0. I find it fairly ridiculous to ask them to enter checkout informations and click on “pay” then the all operation is free of charge.
So here are the key things to do :
- Detect what products are involved in the checkout process, see if we need to apply the “auto-purchase if it’s free” workaround
- Improve the checkout form by :
- Pre-populating fields by all the data we already know about the user
- Removing unnecessary fields
- Have a look at the cart total
- If it’s free, inject JS to automatically trigger the checkout button
All of this is pretty simple, below are the more unique parts.
The first one is hiding the form fields for which we already have data:
/**
 *  Hide the checkout form when all the data needed is already filled
 */
function tlcz_filter_wc_billing_fields( $fields ) {
    // On checkout and if user is logged in
    if ( is_checkout() && is_user_logged_in() ) {
        // Define your key fields below
        $keys_fields = [
        	'billing_first_name',
        	'billing_last_name',
        	'billing_address_1',
        	'billing_address_2',
        	'billing_postcode',
        	'billing_city',
        	'billing_email',
        	'billing_phone'
        ];

        // Loop through your specific defined fields
        foreach ( $keys_fields as $key ) {

            // Check that a value exist for the current field
            if( ( $value = WC()->checkout->get_value($key) ) && ! empty( $value ) ) {
                // Make it readonly if a value exist
                $fields[$key]['class'][] = 'hidden-wc-field';
            } else if ( $key == 'billing_address_2' ) {
            	// This field is optional and can go even if empty
            	$fields[$key]['class'][] = 'hidden-wc-field';
            }
        }
    }
    return $fields;
}
And the insertion of the JS snippet for the automatic checkout:
if ((int)WC()->cart->get_cart_contents_total() == 0) {
  // Automatically validate the order in these conditions
  echo '<script>jQuery("#place_order").click();</script>';
}Bonus points: redirects
If everything works as expected, you can now enable Direct Checkout for WooCommerce:
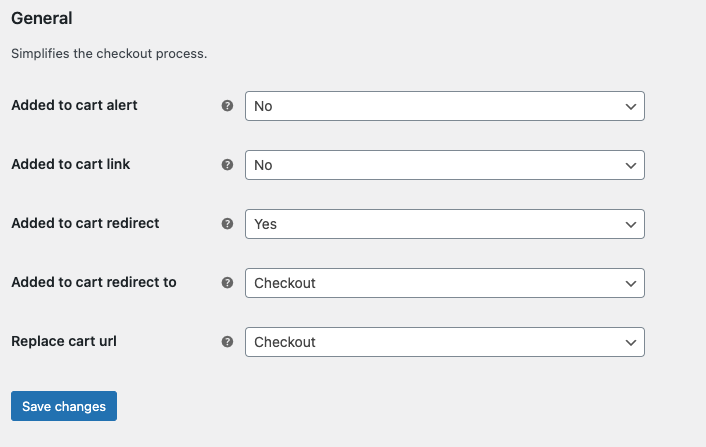
I also like to add a few redirects to make sure we control the user experience:
if ( is_cart() && $_SERVER['PHP_SELF'] != '/wp-admin/admin-ajax.php' ) {
  wp_safe_redirect( site_url('/commander') );
  exit;
} else if ( is_shop() && $_SERVER['PHP_SELF'] != '/wp-admin/admin-ajax.php') {
  wp_safe_redirect( site_url('/mon-compte') );
  exit;
}
Shavasana (conclusion)
Ok, I know this is less detailed than my other articles but this should get you on the right way.
I hope this is useful to you — especially if you’ve taken the time to read up until this part — and will help you provide a great experience to your users or fellow yogis.
Namaste 🙏